Spinnaker has been supporting ECS (+Fargate) for over a year now, but did you know, you can also easily deploy & run Spinnaker itself on ECS/Fargate?
In this blog post I will walk you through our journey of how we ditched the legendary halyard tool (which coincidentally is being deprecated upstream as well) and moved our Spinnaker installation over to Fargate.
Some technical instructions are going to be quite high-level and not too copy & paste friendly as it will highly differ from your requirements and environment, but it will hopefully still give you a good idea 💪. That being said, I assume some type of familiarity with Spinnaker and its configuration, as that would be beyond the scope of this blog post 😅.

Why Fargate?
Here at TIDAL we have started our Fargate journey just a year ago. Being a very tiny DevOps/Platform Engineering team in comparison to many other streaming companies we love the philosophy of serverless as it offloads a lot of infrastructure heavy-lifting off our shoulders, giving us more time to dedicate on actually making an impact by continuously improving the DX (developer-experience).
Hence moving towards serverless services such as Aurora Serverless or Fargate is a relatively natural step.
Why not Halyard?
Terraform (IaC) and automation is what we breathe. Halyard is a tool that unfortunately works as an anti pattern to that:
- creates resources on its own (e.g. outside of terraform)
- only works with its built-in deployment strategies (Fargate is not one of them)
- anything outside of the norm requires “hacks”
- and unfortunately there is a lot “outside of the norm” (= unsupported)
It really forced bad habits on to us and made an automated pipeline to rollout Spinnaker in GitOps style quite complicated.
Additionally, it relies on a single configuration file in yaml format – one can quickly lose the oversight in a single large config vs. smaller “to-the-point” config files.
The good?
We already run our Jenkins managers on Fargate with CasC, where we implement changes on config or infrastructure with code with a pull-request. Once the pull-request is merged in, a roll-out to our many Jenkins managers (~ 1 per team) happens automatically.
This type of flow was something we liked and thus gave us a good vision on how we would like it for Spinnaker as well. No manual steps or complicated tooling should be involved.
Spinnaker consists of many microservices that are all written in Java/Spring, similar to most of our backend microservices. We therefore have incredibly a lot already in place to easily and quickly launch that type of application on our platform.
Releases are bundled versions that work well together, fortunately in versions from 1.20, the upstream docker images are tagged with the release number. So we do not have to worry about managing various service versions anymore.
The bad?
Spinnaker has a relatively bad documentation when it comes to configuration options. It is all over the place. It strikes me almost ironic that their solution is not to improve the documentation but instead create another undocumented tool (halyard).
So, even though we can get rid of halyard, we will still need to work with kleat for config options that we are struggling with but also especially to generate the settings.js which is required for deck. Kleat is at least very lightweight and can just run as a standalone 👏.
Step 1: Building
We are going to start off by creating a mono-repo for all services. You can definitely have each service in its own git-repo if you prefer though. As a very basic gist the repo should look something like this:
.
├── infra/
│ ├── db.tf
│ ├── redis.tf
│ └── services.tf
├── services/
│ ├── clouddriver/
│ │ ├── Dockerfile
│ │ └── clouddriver.yml
│ ├── deck/
│ │ ├── Dockerfile
│ │ └── settings-local.js
│ ├── echo/
│ │ ├── Dockerfile
│ │ └── echo.yml
│ ├── front50/
│ │ ├── Dockerfile
│ │ └── front50.yml
│ ├── gate/
│ │ ├── Dockerfile
│ │ └── gate.yml
│ ├── igor/
│ │ ├── Dockerfile
│ │ └── igor.yml
│ ├── orca/
│ │ ├── Dockerfile
│ │ └── orca.yml
├── Makefile
├── Jenkinsfile
├── spinnaker.yml
└── versions.txt
Thats right, we will basically build a docker image for each service which allows us to make the config-file part of the image, eliminating any requirement for volumes/mounts later on. Any secret or “variable” will be added on container runtime as environment variables.
The versions.txt will contain the Spinnaker release you want to install, in our case that would just be “1.22.1”.
The main spinnaker.yml will contain some shared config options that will be added to each docker image:
You can swap out “front50” for the name of the other services.
Then, add the various service springconfig files. This blog post will unfortunately not be able to help you with that. You will find examples though in the respective web/config folders of each service git repo.
Next, you can use the Makefile. This will loop through the services-folder and build each docker image. You then need to do something similar to push the docker image to your preferred registry.
If running “make build” is successful, you should now have a couple of Spinnaker microservice docker images in your registry ready to be deployed 😇.
Step 2: Infra
We keep infrastructure in the same repo as the code as to avoid any silos between dev <> infra.
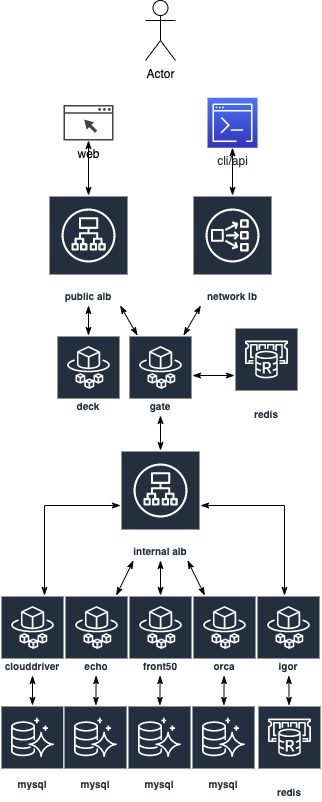
There are quite some resources required in AWS which I will not be able to go through all, but here is a rough list:
- VPC
- 3x load-balancers
- application loadbalancer (internal) for Spinnaker services to communicate with each other (via security-group-rules)
- application loadbalancer (internal) for deck and gate (ideally oauth) – allow access via your VPN, or make it public but restrict IPs
- network loadbalancer (internal) for gate via x509
- 4x aurora-serverless-mysql clusters: clouddriver, echo, front50 and orca
- 2x elasticache redis (non-clustered mode): gate and igor
- 7x ecs services: this will require task-definition + target-group resources as well
Yup, we run each microservice with its own database, be it mysql or redis. That is how we would also run a production microservice. Specifically for Spinnaker it allows us to scope resources more individual and avoids performance issues affecting the whole system.
For most of the resources we use terraform-modules which are currently still very bespoke to our platform, but we might open them up at some point.
If you are done with terraforming it should look something like this:

Step 3: Wrapping it up
Our Jenkinsfile looks very uneventful as we make use of shared pipeline libraries. but in a nutshell it will run on a PR (= dry-run):
make buildand
make -C infra init
make -C infra plan
Additionally on push-to-master (= deploy):
make -C infra applyIf all is good, we can enjoy the color of our money:

In the ECS service, set the deployment min/max health to 100/200. This will ensure zero-downtime deployments as ECS will only replace previous versions once the new version comes up healthy in the target-group (blue/green).
Final words
We are now running a Spinnaker cluster that is high-available and resilient to failures – all this without us, the DevOps/Platform Engineering team having to worry about any of the underlying infrastructure as it is all either serverless, or fully managed by AWS.
Since we are Springframework shop and given that Spinnaker is mainly based on that, it was a very straightforward task for us to switch over as tooling was already available and processes were well defined.
It also allowed us to easily switch on DataDog APM giving us deep insights into issues we were facing previously, resulting in enough background information to open up an issue upstream (clouddriver-ecs doing over 3k mysql queries per search request!!).
Finally, I know this guide is most probably missing a lot of parts to be considered a “walkthrough”, hoping though it gives enough information to come to the conclusion: Spinnaker on Fargate, yes possible, works well, super uncomplicated.
One response to “Running Spinnaker on ECS Fargate”
Hello,
Very interesting article, could you provide a Github repo of your code ?